------------------------
===Introduction===
VMware Player allows for running of virtual machines or preconfigured VMware Appliances from a single OS, meaning that we don't have to go through a costly repartition-format-install whenever we want to try out or run a different OS.
Many Linux distributions come packaged as a Live CD to help reduce the costs of trying out the OS, but a reboot with a CD-ROM drive and a CD burnt from the ISO file is needed. For people like me who have ultraportable laptops (no attached CD-ROM drive), don't want to have too many CDs lying around and don't want to go through the trouble of rebooting my M$ Windoze OS all the time, the VMware Player-Live CD combination would be the best in this case.
There are various restictions/limitations (not mentioned here) when using VMware Player with Live CDs depending on your needs, but for learning and trying out purposes these don't pose any problems.
===Instructions for use===
1. Download and install the free VMware Player.
2. Download the Live CD ISO which you wish to try out (e.g. Ubuntu, DSL, etc.)
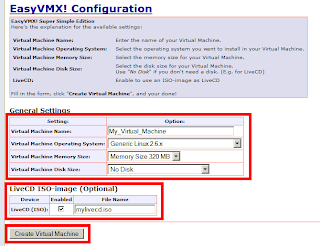
3. Go to EasyVMX.com to create the VMware Player config file needed to run the virtual machine. The Super Simple Edition would suffice for our uses here.
4. Configure the page as follows:

Virtual Machine Name: Any name you want5. Click on "Create Virtual Machine"
Virtual Machine Operating System: Usually Generic Linux 2.6.x for more recent Linux versions
Virtual Machine Memory Size: Stick to the default (safe) option (320MB)
Virtual Machine Disk Size: No Disk (live CDs don't need hard drive space to function, only memory)
LiveCD (ISO): Here's the important part. Check the Enabled box and fill in the full filename of the Live CD ISO that you downloaded in step 2, including the ".iso" extension.
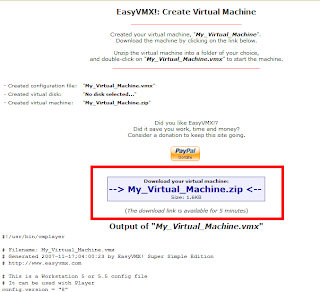
6. Click on the link to download and open the ZIP file.

7. Navigate to the deepest folder, there you'll see a .VMX file named by your virtual machine name. Extract this to the same folder where you kept your Live CD ISO file.
8. You need to do some editing here. Fire up WordPad, and get it to open the VMX file you just unzipped. (You'll need to get it to show all filetypes)

9. Scroll down to the portion which says this:
# Settings for physical CDROM driveAnd swap the "ide1:0"s for "ide1:1"s. If you don't do this step VMware Player will not be able to find the ISO file when booting up, and you won't be able to use the Live CD ;)
ide1:0.present = "TRUE"
ide1:0.deviceType = "cdrom-raw"
ide1:0.startConnected = "TRUE"
ide1:0.fileName = "auto detect"
ide1:0.autodetect = "TRUE"
# LiveCD
ide1:1.present = "TRUE"
ide1:1.fileName = "mylivecd.iso"
ide1:1.deviceType = "cdrom-image"
ide1:1.startConnected = "TRUE"
ide1:1.mode = "persistent"
The results of that section should look like this:
# Settings for physical CDROM drive10. Save the file.
ide1:1.present = "TRUE"
ide1:1.deviceType = "cdrom-raw"
ide1:1.startConnected = "TRUE"
ide1:1.fileName = "auto detect"
ide1:1.autodetect = "TRUE"
# LiveCD
ide1:0.present = "TRUE"
ide1:0.fileName = "mylivecd.iso"
ide1:0.deviceType = "cdrom-image"
ide1:0.startConnected = "TRUE"
ide1:0.mode = "persistent"
11. Double click on the .VMX file, and you're on your way to using the Live CD! Enjoy ;)
PS: Do drop me a comment if you found this useful, or if you have any comments/suggestions to leave behind!
5 comments:
Thanks, very helpful
Thanks, glad it helped!
Very helpful. Thanks.
You're welcome :)
BTW, you can use VMware Server instead, it's free, and you don't have to manually create/edit the VMware config files to run.
Thanks. That was useful.
Post a Comment